How to Make AI Photos Look Real: A Practical Guide for 2026
A photo can look polished and still feel false. The face may be convincing, but the light feels too perfect, the hair sits oddly, or a hand in the background gives the image away. If you’re wondering how to make AI photos look real, start by checking whether the whole scene feels consistent, not by adding more detail to the prompt.
It’s easy to lose the person you’re trying to show while chasing a more realistic result. Each round of changes can shift facial features, smooth away natural skin, or turn a casual portrait into something staged. Realism depends on more than a lifelike face: the light, human details, and context need to make sense together.
This guide shows you what to inspect, from facial features and hands to hair, shadows, and background details. You’ll learn how to refine an image without changing identity or over-polishing it. Whether you’re creating a dating profile, LinkedIn portrait, or social media photo, the aim is the same: an image that looks plausible and still feels like you. CMeIn creates profile-focused AI photos for dating, professional, and social profiles, with an emphasis on credible likeness.
Key Takeaways
- Learn how to make AI photos look real by checking whether the lighting, details, and setting fit together.
- Choose the image’s purpose first, then use clear, recent reference photos and a prompt focused on the scene.
- Review the whole image before inspecting the face, hands, hair, clothing, and background for inconsistencies.
- Fix one visible issue at a time, and avoid edits that smooth away natural features or change your likeness.
- Match profile photos to their use, whether for dating apps, LinkedIn, or social media, while keeping them recognisably you.
Table of Contents
How to Make AI Photos Look Real: The Details Viewers Notice First
A realistic AI photo isn’t simply a sharp image of a convincing face. Its details agree: the light falls from a consistent direction, the subject fits the setting, and small features look as if they belong in the same photograph. The broader field of AI art includes many styles, but a photographic portrait has a specific test: does the whole scene feel plausible, not just the face?
A useful rule is simple: realism depends on consistency, not detail alone. More texture or sharper edges won’t help if the shadows point the wrong way or the person’s expression doesn’t fit their pose.
Which visual cues make an AI photo believable?
Start with the face as a whole. Facial proportions, skin texture, hair, and expression should feel like they belong together and still resemble the person. Skin can show pores, fine lines, and slight colour variation. Hair can have loose strands or uneven edges. These small variations often feel more lifelike than flawless skin and perfectly arranged hair.
Then look beyond the face. Light should affect the face, clothing, and nearby surfaces consistently. If a window appears to be the light source, check that shadows and reflections make sense for that direction. Natural posture matters too: someone leaning on a table should appear to meet it, not hover above it. A plausible background gives the subject somewhere to be.
Why do some AI photos look fake at first glance?
The first giveaway is often a mismatch. Skin may be crisp while the eyes or hair are oddly blurred. A face can be evenly lit while the neck casts a hard shadow. Background lines may bend, or reflections may show shapes that aren’t in the scene. Each flaw may be small, but together they interrupt the sense that one camera captured everything.
Over-editing creates a different problem. Smoothing away skin texture, making both sides of a face unnaturally alike, or brightening every shadow can remove the unevenness people expect from a photograph. A stylised portrait isn’t automatically a mistake. Strong colour, soft focus, or studio lighting can be deliberate choices. They feel less photographic when details conflict with the chosen style or with one another.
Sharpness can distract from the bigger question: does the image make sense as a whole? Zoom in to inspect the face, then zoom out and check whether the person belongs in the scene. A believable image doesn’t need every pore or background object to be perfect. It needs enough agreement between the subject, the light, and the surroundings that nothing pulls attention away for the wrong reason.
For profile photos, ask whether the image feels like a plausible version of the person, rather than a polished stranger. A strong portrait can look neat without erasing natural features. When you assess how to make AI photos look real, judge coherence and likeness before adding more detail or polish.
Set Up the Image: Inputs and Prompts That Support Realism
A believable result starts before generation. Decide what the photo needs to do, then give the image model clear references and a scene it can interpret. A dating portrait, LinkedIn headshot, and travel photo call for different settings, framing, and mood. Making those choices upfront also helps you tell whether a change improved the image or simply changed the person.
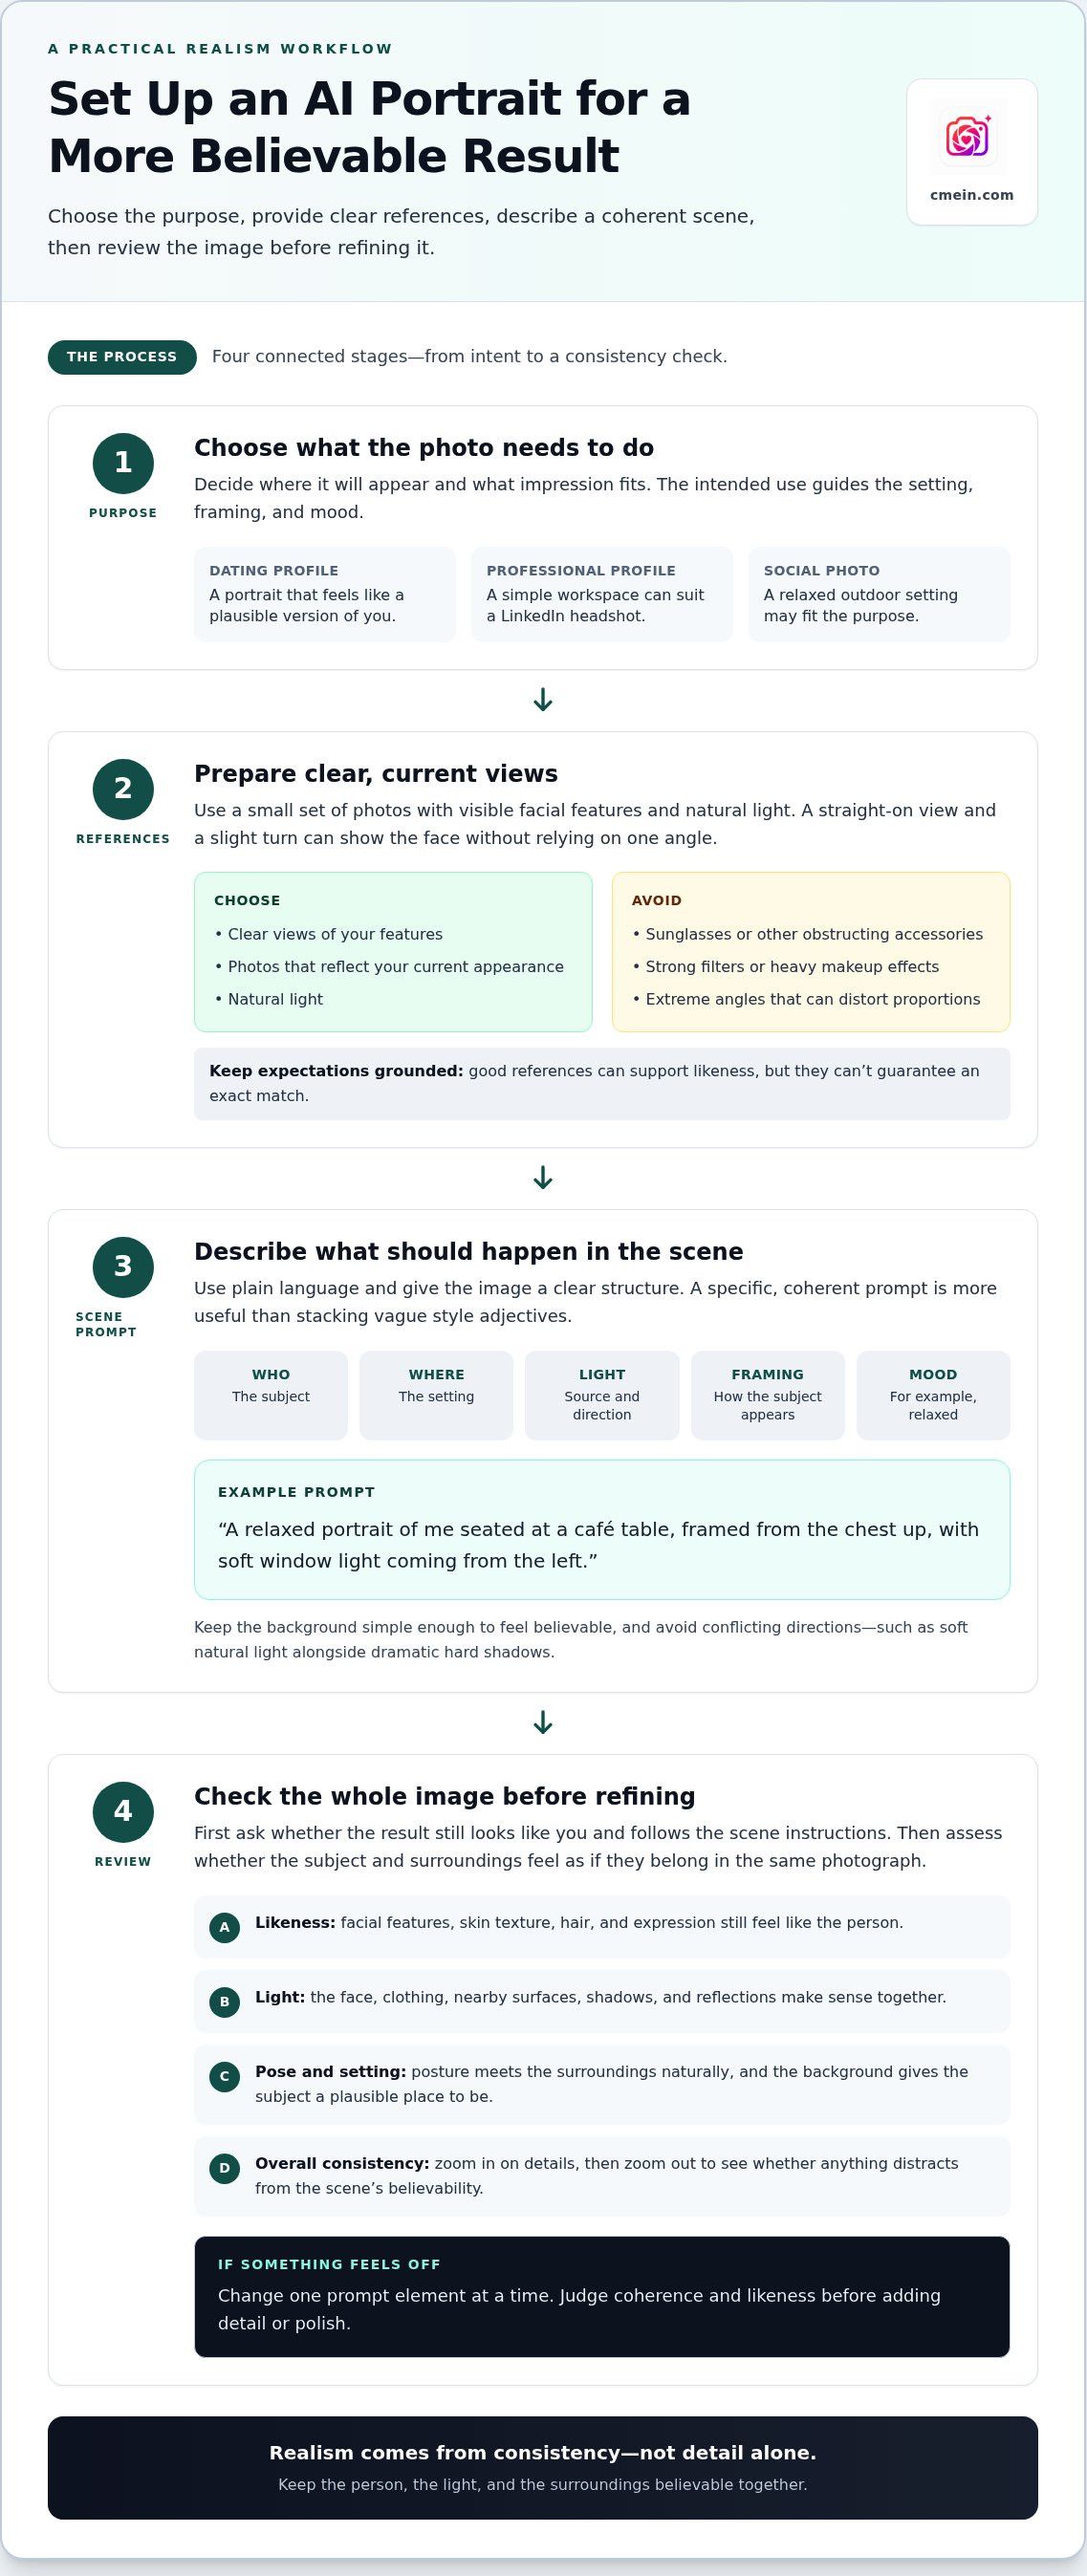
Use this sequence to set up a realistic image:
- Choose the intended use. Decide where the photo will appear and what impression fits. A professional profile may call for a simple workspace, while a social photo may suit a relaxed outdoor setting.
- Prepare your references. Select clear, recent photos that show your features accurately. Choose images where your face is easy to see, without strong filters or obstructing accessories.
- Describe the scene. State who is in the image, where they are, how they’re framed, and where the light comes from. Ask for a relaxed expression rather than a forced grin.
- Review the output. Check whether the result still looks like you and whether the scene follows your instructions. If something is off, change one prompt element before generating again.
A specific, coherent prompt beats a pile of style adjectives because it describes what should happen in the scene, not just how the image should feel.
How should you prepare reference photos?
Choose a small set of clear views with visible facial features and natural light. A straight-on view and a slight turn can show the face without making one angle do all the work. Skip sunglasses, strong filters, heavy makeup effects, and anything else that hides key features. Extreme angles can distort proportions, while old photos may no longer reflect your current appearance. Good references can support likeness, but they can’t guarantee an exact match.
What should a realism-focused prompt include?
Name the subject, setting, light source, framing, and mood in plain language. For example: “A relaxed portrait of me seated at a café table, framed from the chest up, with soft window light coming from the left.” This gives the scene a clear structure without stacking on vague directions such as “cinematic, stunning, perfect, ultra-realistic.” Keep the details physically plausible, and adjust one element at a time.
For a profile image, choose a setting that suits its purpose without competing with the person. Keep the background simple enough to feel believable, and avoid conflicting directions, such as soft natural light alongside dramatic hard shadows. CMeIn’s AI profile photos are created for dating, LinkedIn, and social media, with an emphasis on a credible likeness.
Compare the output with your original aim. Did the scene, light, and framing come through? Does the face still feel familiar? If the image misses, identify the clearest mismatch and adjust only that part of the prompt. This measured process helps you understand how to make AI photos look real without turning each revision into a new version of you.
How to Check an AI Photo for Realism Before You Use It
A portrait can pass at thumbnail size and reveal problems once it’s opened full-screen. Review it at both sizes. Start with the overall impression, inspect specific areas, then check that the image still represents you. This order helps you catch obvious issues without mistaking every small variation for a flaw.
Before publishing, inspect the face, hands, hair, clothing, background, and the way light and perspective hold together.
- View the whole image. Check whether the subject fits the scene and whether the framing feels balanced. Notice anything that draws your eye for the wrong reason.
- Enlarge the face and hair. Look at the eyes, teeth, ears, hairline, and strands around the head. Zooming in can expose smudges or odd joins hidden at thumbnail size.
- Check hands, clothing, and accessories. Inspect fingers, jewelry, collars, seams, and garment edges. Look for shapes that seem fused, broken, or disconnected.
- Scan the background. Check text, repeated patterns, and objects that seem to merge. Make sure straight lines and nearby objects don’t bend without a reason.
- Review the scene’s depth and light. Compare shadows and reflections with the apparent light source. Check that perspective feels consistent and that blur doesn’t jump sharply between nearby parts of the scene.
Don’t judge only by magnifying every pixel. Some softness, grain, or unevenness can be part of the intended photographic style. Ask whether a detail looks plausible in context, not whether it’s perfectly neat.
Which common artifacts should you look for?
Pay close attention to small, connected shapes. An earring may blend into an ear; fingers may appear to join; teeth may look too uniform; or a sleeve may melt into the background. In a street scene, repeated windows or warped lettering can stand out. Check the surrounding area before deciding a detail is wrong. A partly hidden hand, for example, may simply be obscured by the pose.
How can you tell whether the image still looks like you?
Compare it with your references, focusing on stable features such as face shape, the spacing of your features, and distinctive details. Then check expression, age cues, and skin tone. Lighting can change how skin appears, but an image that changes your recognisable features or makes you look like a different age may not feel true to you. Polish isn’t a substitute for likeness.
Use a final side-by-side check: does the image look coherent, and would someone who knows you recognise you? If it’s attractive but no longer feels like an accurate representation, set it aside. When learning how to make AI photos look real, the review isn’t complete until both the scene and the person feel believable.
Refine AI Photo Realism Without Overediting or Misleading Viewers
Once you’ve spotted an issue, resist the urge to rebuild the image around it. Each extra change can introduce a new artifact, shift facial features, or make skin look less natural. A restrained edit cycle keeps the original aim in view: fix what distracts without polishing away the person.
Use this simple cycle:
- Name one visible issue. Be specific, such as “the shadow under the chin is too dark” or “the hair edge blends into the background.”
- Request one targeted correction. Describe the change you want and what should stay the same, such as the face, lighting, and scene.
- Compare the revision. Look at the new version beside the previous one. Check whether the flaw improved and whether anything else changed.
- Review the whole image again. A local adjustment can affect nearby details. Stop when the correction holds and the image still feels coherent.
Cosmetic changes are tempting, but they aren’t always useful. Smoother skin, brighter eyes, or more symmetry may make a portrait look polished while weakening its likeness. Prioritise an inconsistency that draws attention over a feature that’s simply natural.
How can you fix a flaw without changing the whole image?
Describe the visible feature and the desired correction in plain terms. For example, ask to soften the hard shadow on the wall while keeping the face, pose, and light direction unchanged. Avoid broad instructions like “make everything more realistic,” which can alter parts of the image that already work. Compare each revision with the last, not just with your ideal, and stop once the fix holds.
When should you keep, revise, or discard an image?
Keep an image if your likeness and the scene feel consistent at normal viewing size. Revise it if one distracting flaw stands out and the rest works. Discard it if the result materially changes your identity or shows an experience that didn’t happen. A convincing travel setting, for instance, shouldn’t be presented as proof you visited that place.
Be honest about context as well as appearance. Before posting, check the relevant platform’s current image policies, especially if the image is AI-generated or could give viewers a misleading impression. Requirements can vary and change, so don’t assume that a photo suitable for one profile or use is automatically suitable for another.
The practical test for how to make AI photos look real isn’t whether every feature looks perfected. It’s whether a focused correction improves the image without changing who it represents. CMeIn creates profile photos designed to retain a credible likeness.
Create More Natural-Looking Profile Photos with CMeIn
A profile photo doesn’t need to look flawless to work. It needs to look like you, make sense as a scene, and suit the impression you want to give. Those three checks matter more than a highly polished finish. If the image feels like a different person or an implausible moment, extra refinement won’t solve the underlying problem.
CMeIn creates AI-generated photos for dating profiles, LinkedIn, and social media, including lifestyle and travel images. The aim is natural-looking results that retain a credible personal likeness. The image should feel appropriate for its setting, not just attractive in isolation.
Match the image style to the profile it will serve
A LinkedIn portrait can feel composed and professional without looking stiff. A dating or social profile photo can feel more casual, but the clothes, expression, and surroundings should still fit together. A relaxed expression in a natural setting may feel more credible than a formal pose in a scene that seems unrelated. Choose a visual style that supports the impression you want to make while still feeling like you.
A simple final check before choosing your image
Look at the photo as a small thumbnail, then open it at full size. At thumbnail size, check that your face reads clearly and the overall image feels right. At full size, look for distracting details and confirm that your features still feel familiar. Don’t choose a photo just because it has the smoothest skin or brightest lighting. Choose the one that seems most plausible and true to you.
Before settling on an image, use this quick final checklist:
- Likeness: Do your facial features and expression still feel recognisably yours?
- Consistency: Do the subject, lighting, clothing, and surroundings belong in the same scene?
- Context: Does the setting support the impression you want to give without implying something untrue?
- Restraint: Does the image look natural at both thumbnail and full size, without needing more polish?
If one answer is no, pause before choosing the photo. A small, focused correction may help if the rest of the image works. If the likeness or scene feels wrong, a more polished version may still not be the right choice. The point of learning how to make AI photos look real is not to remove every imperfection. It’s to find an image where believable context and recognisable likeness meet.
CMeIn creates AI profile photos for dating, LinkedIn, and social media. See CMeIn’s AI profile photo options for images designed to feel natural while still looking like you.
Choose a Photo That Still Feels Like You
The best profile photo isn’t the one with the most polish. It’s the one you can use with confidence because it feels like a believable version of you. Keep that in mind as you put how to make AI photos look real into practice: realism should support your identity, not replace it.
Your next step is to decide where you want the image to take you. A dating profile, LinkedIn page, and social account each call for a different kind of presence. CMeIn offers AI-generated photo options for those profiles, as well as travel and lifestyle photos for personal use. Choose a direction that fits your real interests and the impression you want to make.
You don’t need to chase a perfect image. Start with a clear idea of how you want to show up, then look for a photo that feels natural and recognisable. Explore CMeIn’s AI profile photos and choose an option that fits the way you want to be seen. A credible image can be polished without feeling staged, and it can still feel unmistakably yours.
Frequently Asked Questions
Can AI photos look completely real?
Some AI photos can look convincing in ordinary viewing, but no image is guaranteed to pass every close inspection. A portrait might seem natural on a phone screen yet show strange details when enlarged, printed, or viewed beside other photos of the same person. Think of “real” as plausible for its intended use, not as proof that the image came from a camera.
Why do AI-generated faces sometimes look unnatural?
AI-generated faces can look unnatural when features don’t sit together as expected, or when a face seems too smooth and evenly balanced. Expressions can also feel out of step with the pose, making a smile appear fixed rather than relaxed. For a more believable result, aim for an ordinary expression and keep distinctive features instead of asking for a flawless or idealised face.
How do I make an AI photo look less edited?
Ask for changes that restore a natural quality rather than adding more polish. For example, if the skin looks airbrushed, request visible natural texture while keeping the person’s features unchanged. Avoid broad edits that brighten, smooth, and reshape everything at once. If a photo feels overworked, returning to an earlier version may be better than trying to correct it with another layer of edits.
What should I include in a prompt for a realistic AI photo?
Describe the person, where they are, how close the camera is, the light source, and the mood. For example: “A relaxed waist-up portrait of me in a quiet bookshop, lit by daylight from a nearby window.” Keep the scene believable and avoid mixing directions that compete, such as dim indoor lighting with bright midday sun. Clear instructions make the result easier to judge.
Can AI image tools preserve a person’s likeness?
They can aim to retain likeness, but results vary by tool, reference quality, and the changes requested. Use current photos that show your face clearly, and compare the result with features that stay recognisable across different expressions, such as your face shape or eye spacing. If a revision changes those traits, don’t assume another prompt will restore them. Choose a result that still feels like you.
How can I check whether an AI photo has visual artifacts?
Review the image at its intended display size, then inspect it more closely. Check small connected areas such as glasses against the face, fingers around an object, or a necklace near a collar. Also look for text that turns into unreadable marks and repeated details in the background. One unusual detail isn’t always a defect, so consider whether it looks plausible in the full scene.
Is it misleading to use an AI-generated photo on a profile?
It can be misleading if the image gives people a false idea of your appearance, identity, or experiences. A useful profile photo should represent you, even if it shows a setting you didn’t photograph yourself in. Be especially careful with images that imply you visited a place or attended an event. Consider the platform’s current rules and make your choice with the expectations of your audience in mind.