How to Remove AI Labels and Metadata from Photos

To remove AI labels from a photo, you strip the hidden metadata that tells platforms the image was generated or edited with AI, then re-save the file so the tags do not return. The labels you see on social apps are usually triggered by embedded fields such as IPTC, XMP, or C2PA data, not by the pixels themselves, so a clean export is often enough.
This guide walks through the process in order: finding what your file carries, choosing a removal method, verifying the result, and deciding whether a label should come off at all. It is written for people who use AI-generated photos on dating apps and professional profiles and want those photos to upload without friction.
What You Need Before You Start
You need the original image file, a metadata viewer, and a removal tool. Gather these before changing anything.
- The original file. Work on a copy, never the only version you have.
- A metadata viewer. Your computer's file properties panel works, as does the free command-line tool ExifTool.
- A removal tool. Options include your operating system's built-in properties dialog, a browser-based cleaner, or ExifTool.
- Five minutes per batch. Most images take seconds once your method is set.
Keep the source file untouched in a separate folder. If a strip goes wrong, you can always return to it.
Step 1: Identify What the Photo Is Carrying
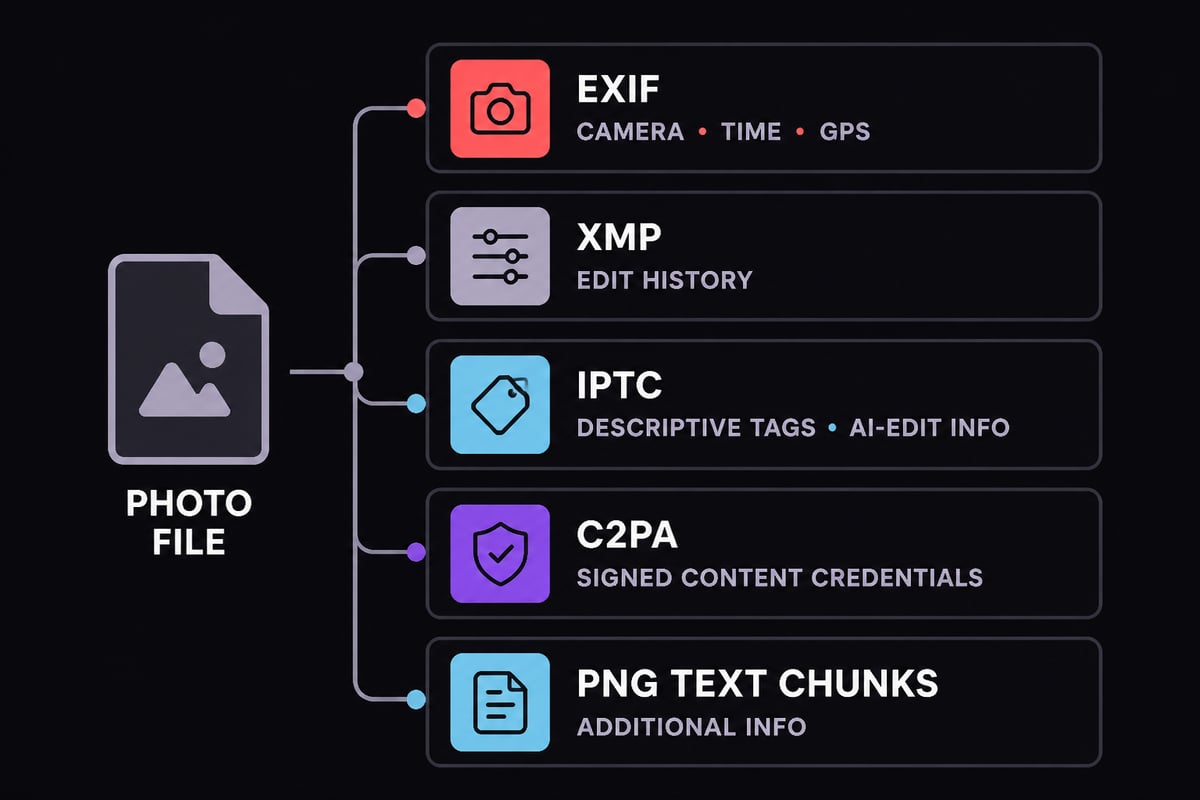
The first step is to inspect the file, because different platforms react to different metadata fields. Open the file's properties or run it through a viewer and look for entries labeled as follows.
- EXIF: camera model, timestamps, software name, and often GPS coordinates.
- XMP: an editable block that editing software uses to record tools and edit history.
- IPTC: descriptive fields. Google Photos notes that AI-edit information may appear in a photo's IPTC metadata and can be edited or removed, and that not all images contain AI information.
- C2PA content credentials: a signed record of how an image was made or changed.
- PNG text chunks: prompt or generator text that some tools write into PNG files.
Note which fields mention an AI tool or a generator. Those are the ones that most often trigger an automatic label. Also note any GPS fields, since location data is a separate privacy concern worth handling at the same time.
Step 2: Decide Whether the Label Is Accurate
Before you remove an AI label, confirm the label is wrong or unnecessary, because removing an accurate disclosure can break a platform's rules. If a photo was generated entirely by a model, the label is accurate. If you only retouched a real photo, cropped it, or ran it through a filter, the flag may be a false positive.
Consider your situation honestly. A real photo of you that a phone's editing feature touched slightly does not deserve the same treatment as a fully synthetic image. Platform policies differ, and several require disclosure when content is realistic and AI-made. Check the rules of the app you are posting to.
For dating profiles in particular, the label question connects to trust. A photo that looks like you in person is the goal, and how faithfully the image represents your real appearance matters most. Matching your actual face and build matters far more than any tag in the file.
Step 3: Remove Location and Personal Data From Your Photos
Start with the most sensitive fields, since GPS coordinates and timestamps expose more about you than an AI tag does. Strip these on your phone before the image ever leaves your device.
On an iPhone, Apple Support explains that you can open a photo in Photos, choose Adjust Info, then Adjust Location, then No Location. You can also turn off Camera access to Location Services so future photos are not tagged. Apple's Photos sharing options also let you control whether location and other metadata are shared with a photo, so check the share options and switch off location before sending.
On Android, open the photo in your gallery, view its details, and remove location data from there, or disable location tagging in the camera settings. On a desktop, the file properties dialog in Windows offers a Remove Properties and Personal Information option, and macOS Preview lets you inspect and clear location fields.
This pass handles privacy. The next steps handle the AI-specific fields.
Step 4: Strip AI Metadata With a Browser-Based Cleaner
The quickest way to remove AI metadata for most people is a browser-based cleaner that processes the file locally and exports a clean copy. Choose a tool that states it works in your browser without uploading the image to a server, since uploading a personal photo to an unknown service defeats the purpose of cleaning it.
A reliable process looks like this:
- Open the cleaner and drag in your copy of the photo.
- Select the fields to remove: EXIF, XMP, IPTC, C2PA, and PNG text chunks.
- Export the cleaned file under a new name.
- Open the new file's properties and confirm the AI references are gone.
Batch tools help if you are preparing several images for a dating profile, such as a set of six photos across different scenes. Process the whole folder once rather than repeating the steps per image.
Step 5: Use ExifTool for Precise Control
ExifTool is the most thorough option if you are comfortable with a command line, and it lets you remove everything or only selected tags. The ExifTool documentation describes the -all= option for deleting image metadata, with a warning against using it on most proprietary RAW formats, because the metadata may be needed to convert the image.
A basic strip on a JPEG copy looks like this in the terminal:
exiftool -all= photo-copy.jpg
ExifTool can keep a backup of the original file, so keep that backup until you have verified the result.
Protect Color When You Strip a JPEG
Removing every tag can change how a JPEG displays. The ExifTool FAQ cautions that removing all metadata from JPEGs can affect color rendition, and it gives an example that preserves the ICC profile and color-space tags. If skin tones look flatter or oversaturated after a strip, this is the likely cause. Re-run the strip using the FAQ's approach so the color profile survives.
Skin tone accuracy matters when the goal is a photo that looks like you. A color shift can make you appear more tanned, paler, or washed out than you are in person, which undermines the entire reason for using a realistic photo.
Step 6: Re-Save Through a Clean Export
If a tool leaves stubborn tags behind, a fresh export often clears them. Open the image in an editor, export it as a new JPEG, and disable the option that writes metadata or content credentials. This produces a new file without the original wrapper, though it recompresses the image slightly.
Use a high quality setting so you do not introduce visible artifacts. Heavy compression can soften fine detail, and repeated exports compound compression loss.
Step 7: Verify the Result Before You Upload
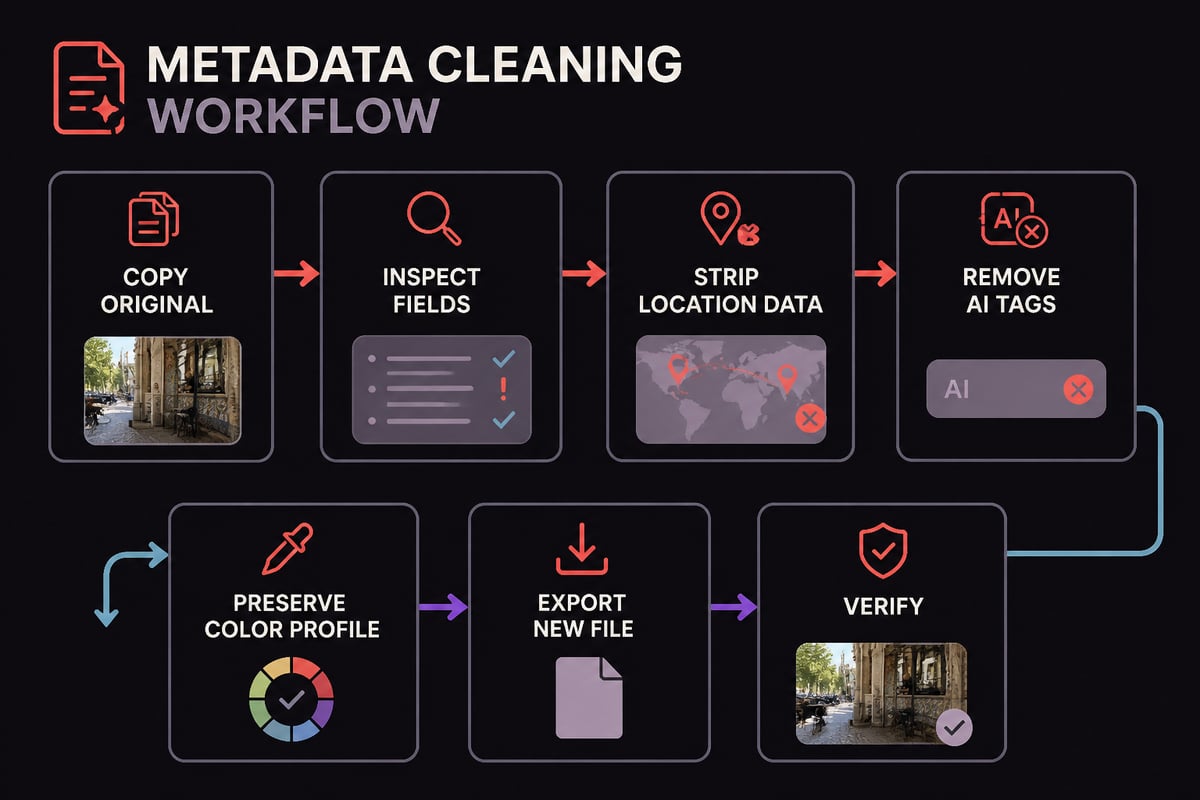
Verification is the step that confirms the work, so open the cleaned file's properties and check that no AI generator names, prompts, or content credentials remain. Run it through the same viewer you used in Step 1 and compare the output.
Check for these specifically:
- No software or generator name in EXIF or XMP.
- No IPTC fields describing AI generation or editing.
- No C2PA manifest attached.
- No GPS coordinates or precise timestamps.
- Color looks the same as the original on your screen.
Then test the upload. Post the image to a private or draft setting if the platform allows it, and see whether an AI label appears. If one does, the platform may be reading something other than metadata, which brings up the next point.

Step 8: Know What Metadata Removal Cannot Do
Stripping metadata removes the tags in the file, but it does not hide the image from platforms that analyze the pixels. Some services run their own detection on the visual content and may apply a label regardless of what the file says. No cleaner changes that.
This is why the quality of the image itself matters. Photos with plastic skin, warped hands, or oddly perfect backgrounds draw attention whatever the metadata says. Realistic output with natural texture and believable settings holds up far better, a point covered in can people tell if a photo is AI. If a label appears after a clean export, the image may simply look synthetic, and the fix is a better source image.
Read the privacy terms of any free tool before uploading anything that shows your face.
Remove AI Labels From Specific Platforms
Each platform reads metadata differently, so a short comparison helps you decide where cleaning matters most.
| Platform | What typically triggers a label | Practical step |
|---|---|---|
| Instagram and Facebook | C2PA and IPTC fields, plus self-disclosure | Strip metadata, then follow the app's disclosure rules |
| TikTok | Content credentials and creator disclosure | Remove C2PA data and check the AI toggle |
| Google Photos | IPTC AI-edit information | Edit or remove the IPTC fields |
| Content credentials on uploaded images | Clean metadata and use an accurate likeness | |
| Dating apps | Mostly user reports and photo review | Use a true-to-life image with clean metadata |
Policies change often, so review each app's current guidance before relying on this table.
Common Mistakes and Troubleshooting
Most failed attempts trace back to a handful of avoidable errors.
- Cleaning the only copy. Always work on a duplicate so you can recover the original.
- Stripping RAW files. The ExifTool documentation warns against using
-all=on most proprietary RAW formats. Convert first, then clean the exported JPEG. - Color shifts after a strip. Preserve the ICC profile as the ExifTool FAQ describes.
- Uploading to a questionable cleaner. Use tools that run locally in your browser or on your own machine.
- Label still appears. The platform may be analyzing pixels. Improve the source image rather than repeating the strip.
- Metadata returns after editing. Some editors rewrite tags on save. Clean as the final step, after all editing is done.
- Forgetting screenshots and re-uploads. A screenshot creates a new file with its own metadata, which can carry device details.
If a label persists and you believe it is a false positive, most platforms provide an appeal or edit option. Use it rather than fighting the system with repeated re-uploads.
When a Cleaner Is the Wrong Tool
A metadata cleaner solves a file problem, not an image problem. If a photo looks unlike you, no tag removal fixes that, and a mismatch between your profile and your appearance in person is what costs you matches and trust. Smoothing, slimming, or aging your face in either direction creates the same issue.
Backgrounds are a related case. If your issue is a cluttered scene rather than a label, a tool to remove the background from a photo may serve you better than metadata work. And if you are building a profile set from scratch, guidance on realistic AI photos of yourself helps you start from images that need less cleanup in the first place.
FAQ
Can I remove AI for free?
Yes. Your phone's built-in location controls, your computer's file properties dialog, and ExifTool all remove metadata at no cost. Choose a method that processes the image on your own device so the photo is not uploaded anywhere.
Is there any way to get rid of AI labels permanently?
Not across every platform. Metadata removal clears the tags in the file, but a platform can still add a label based on its own analysis of the image or your disclosure settings. Check the app's AI or content settings and clean each file before upload.
Will removing metadata lower my photo quality?
Stripping tags alone does not change the pixels, so quality stays the same. Quality can drop if you re-export a JPEG at low settings or repeat the export several times, and colors can shift if the ICC profile is deleted.
Today, take one photo you plan to post, make a copy, and run it through the inspection in Step 1 to see what it actually carries. If you would rather start with images that look like you and need less cleanup, CMeIn generates realistic photos from your reference pictures with no smoothing or beautifying, keeps your uploads private by default, and works without a subscription. Start with your photos, and you can post across dating apps, LinkedIn, and Instagram with images that represent how you look in person.